Introduction
What you'll learn: how to set up a safe, repeatable home dry‑aging process in 2026; which cuts to buy; how to control temperature, humidity and airflow; monitoring practices that use current consumer tech; and how to trim and cook the finished product. Who this is for: serious home cooks and food‑enthusiast readers who want restaurant‑level dry‑aged beef without unnecessary risk or wasted product. Why it matters: dry‑aging concentrates flavor and changes texture, but small mistakes cost money and increase food‑safety risk. This updated guide reflects equipment and monitoring advances through mid‑2026 and gives practical, actionable steps you can follow now.
Prerequisites / Context
Before you begin, understand three things:
- Skill and space: You need a dedicated refrigeration space (or a dry‑aging bag workflow) and confidence with basic butchery and sanitation.
- Time and cost: Dry‑aging takes weeks; expect 10–40% yield loss and the cost of electricity, equipment and trimming time.
- Regulatory: Home‑aged meat is fine for personal use in most U.S. jurisdictions, but selling home‑aged meat is regulated—check local rules if you plan to commercialize.
Step 1 — Choose the right cut
- Buy whole primals or subprimals: bone‑in ribeye (prime rib roast), strip loin (NY strip), or large sirloin subprimals. Sizes in the 8–20 lb range work well; larger pieces retain interior moisture better.
- Prefer high‑marbling grades (USDA Prime or high Choice) for the best balance of flavor and yield. You can dry‑age Choice with good results, but expect slightly leaner final steaks.
- Buy from a trusted source—an inspected butcher or reputable grocery. Ask when the carcass was fabricated and how it was stored; fresher starting meat gives more predictable results.
Step 2 — Decide on bagged vs bagless aging
Two main home approaches exist in 2026:
- Bagless (traditional) dry‑aging: Exposes the roast to controlled air to form an exterior crust and allow moisture loss. Requires a dedicated fridge/cabinet with RH control and monitored airflow.
- Permeable dry‑aging bags (e.g., UMAi‑style): The bag allows moisture to escape slowly while reducing surface contamination and trim loss. These bags make aging in a regular refrigerator possible and remain widely used by home cooks and pros in 2026.
Which to choose: bagless gives the classic, slightly oxidized exterior that some restaurants prefer; bags reduce trim loss and are simpler for first‑timers. Both produce recognizable dry‑aged flavor if temps and time are correct.
Step 3 — Equipment and updated tech (2026)
Key variables remain the same: temperature, humidity and airflow. What’s new in 2026 is accessible monitoring and connectivity.
- Dedicated enclosure: Use a converted spare refrigerator or a consumer dry‑aging cabinet. Since 2021–2025 several manufacturers brought consumer units to market with built‑in RH control and app integration—if you buy one, confirm it supports the 34–38°F and 75–85% RH window.
- Temperature control: Maintain 34–38°F (1–3°C). Use a reliable external controller and at least two sensors: one near the meat surface and one at the rear air stream. In 2026, low‑cost Wi‑Fi data loggers and controllers with cloud alerts are routine—enable alerts for deviations >2°F.
- Humidity control: Target 75–85% RH (ideal ≈80%). Modern small humidifier/dehumidifier combos designed for mini‑fridges are now common; passive methods (tray of salted water) still work for short runs but are less precise.
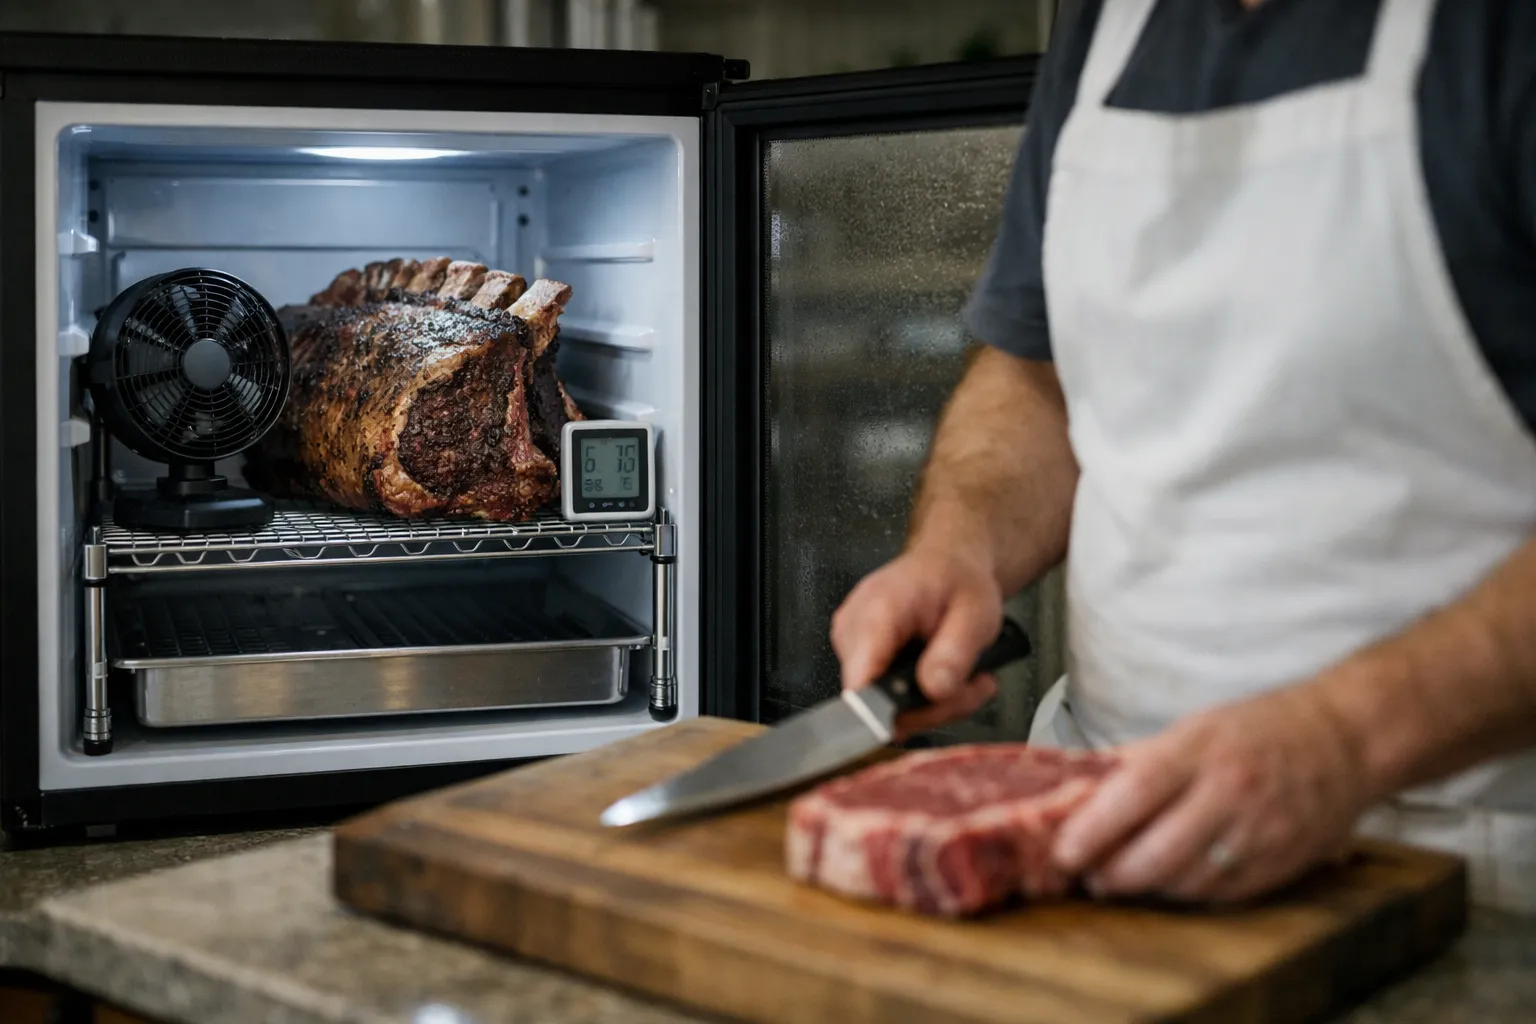
- Airflow: Gentle, continuous airflow prevents stagnant pockets—use a small computer fan or low‑speed inline fan. In 2026, variable‑speed fans controlled by the controller are affordable and allow fine tuning to avoid patches of rapid drying.
- Monitoring: Use two independent measurement systems—one local display and one remote logger/app. Log temperature and RH at 5–15 minute intervals so you can review trends; set audible or mobile alerts for excursions.
- Sanitation and surfaces: Stainless racks, drip trays, food‑safe sanitizers and disposable gloves. Consider using NIST‑traceable thermometer probes or calibrating devices before each batch.
- Optional: Dry‑aging bags, vacuum sealer for post‑trim storage, and a UV interior light for occasional cabinet sanitizing (not as a replacement for cleaning).
Step 4 — Install and precondition the cabinet
- Clean and sanitize the unit thoroughly; remove shelves and scrub with food‑safe sanitizer.
- Install temperature and RH sensors at meat level (near where roasts will sit) and a secondary sensor opposite the fan to monitor circulation.
- Position your fan and humidifier/dehumidifier. If your controller supports it, connect variable fan speed to maintain stable RH without over‑drying.
- Precondition the unit for 24–48 hours and verify stable readings: temp 34–38°F and RH ≈75–85%. Confirm the controller’s alert thresholds are set (e.g., temp ±2°F, RH ±7%).
Step 5 — Prepare and load the roast
-
1. Do not salt or season the roast before aging—aging should begin on unseasoned meat.
2. Leave bones and fat cap intact; they protect the meat and add flavor.
3. Place the roast on a stainless wire rack with a drip tray beneath; ensure air circulates around all sides.
4. If using a dry‑aging bag, place the roast in the bag per manufacturer instructions and set on the rack, not directly on the tray.
Step 6 — Temperature, humidity and timing
Target window remains the same because it’s based on microbiology and enzymology:
- Temperature: 34–38°F (1–3°C)
- Relative humidity: 75–85% (≈80% ideal)
- Airflow: Gentle, steady circulation
Typical aging windows and effects:
- 14–21 days: Tenderness improves; flavor begins to concentrate. Good balance of yield and flavor.
- 28–45 days: Classic dry‑aged profile—nutty, beefy, more complex aromatics.
- 45–120+ days: Intense concentration and funk; yield loss increases markedly. Most home cooks stop before 60 days for cost reasons.
Yield expectations (approximate):
- 21 days: ~10–20% weight loss
- 28–45 days: ~18–30% weight loss
- 60+ days: ~25–40%+ weight loss
Step 7 — Monitoring and troubleshooting (practical 2026 workflows)
- Daily quick checks: Confirm temp and RH, inspect surface for unusual growth, and ensure fans are running. Remote alerts should notify you of any excursions so you can respond quickly.
- Mold inspection: White or gray dry, velvety growths are common and can be trimmed away; colored (pink, green, black) fuzzy growth, sliminess, or a putrid/ammonia smell are red flags—discard the roast if present.
- Condensation: Avoid water droplets on meat; if you see condensation, reduce RH and increase airflow slightly.
- Temperature excursions: If internal cabinet temperature climbs above 40°F (4°C) for several hours, evaluate safety—prolonged warm periods increase bacterial risk. Modern controllers can cycle compressors or send alerts—respond promptly.
Step 8 — Trim, portion and store
- Bring the aged roast to a cool, sanitized cutting area. Keep a meat thermometer and sharp boning knife ready.
- Trim the desiccated exterior: remove the hard crust (dried fat and oxidized meat) until you reach rosy, intact muscle. Trim conservatively on first attempts to learn the thickness of the crust at your chosen aging time.
- Portion into steaks (ribeye 1.5–2" thick is classic), roasts, or vacuum‑pack for freezing. Vacuum sealing after trimming preserves your product and extends freezer shelf life.
Cooking dry‑aged steaks
Because dry‑aged beef is more concentrated and can form a crust quickly, cook to preserve juiciness and highlight flavor:
- Reverse sear: Slow to target temp (oven or sous‑vide), then high‑heat sear for crust. Ideal for thicker steaks and for retaining medium‑rare interiors.
- High‑heat sear: Sear quickly in a very hot cast‑iron pan and finish briefly in the oven. Watch timing—dry‑aged steaks can overbrown sooner.
- Seasoning: Minimal—coarse salt and cracked pepper are usually enough. Apply salt 40–60 minutes before cooking or immediately before searing, depending on your preferred crust and moisture behavior.
Cost, yield and decision checklist (updated considerations)
Dry‑aging at home remains a tradeoff between time, equipment investment and the pleasure of the process. Example math (adjust numbers for local prices):
- Purchase: 12 lb bone‑in rib roast at $16/lb → $192 initial cost.
- After 28 days with ~25% loss → ~9 lb usable → effective cost ≈ $21/usable lb (plus energy and equipment amortization).
In 2026, consider these new variables: availability of professionally dry‑aged retail steaks has increased (giving you a benchmark for flavor at a one‑off cost), and consumer cabinets reduce risk for frequent agers. If you plan to age regularly, investing in a dedicated cabinet and monitoring tools usually pays off in consistency and lower trim loss.
Common mistakes to avoid
- Using the main household refrigerator—door openings and other foods change temp and increase contamination risk.
- Failing to monitor with redundancy—rely on at least two sensors and a remote alerting logger.
- Overdrying with excessive airflow—too strong a fan speeds moisture loss and increases trim loss.
- Ignoring unusual odors or colored mold—these are signs to discard the batch rather than risk foodborne illness.
- Trimming too aggressively on your first attempt—learn how thick the crust forms in your system before cutting deeply.
Pro tips (advanced)
- Log and compare batches: keep a simple spreadsheet of start date, weight, temp/RH profile and yield to refine timing for your taste.
- Calibrate sensors seasonally with an NIST‑traceable thermometer or 3‑point hygrometer check to ensure accuracy.
- For long aging (60+ days), consider alternating short bagged periods with brief unbagged finishing to manage oxidation and flavor intensity.
- Use sous‑vide for larger roasts: sous‑vide cooking before finishing sear can reduce risk of overcooking and maximize tenderness for home‑aged steaks.
FAQ
Is dry‑aging safe to do at home?
Yes, when you follow safe temperature (34–38°F), humidity (75–85% RH) and sanitation practices, and monitor conditions with redundancy. Use whole‑muscle cuts only, keep equipment dedicated and clean, and discard any roast showing slimy texture, strong ammonia/putrid odors, or fuzzy colored molds.
Can I dry‑age in my regular refrigerator?
Two practical paths: use a permeable dry‑aging bag (which reduces contamination and trim loss) inside a regular fridge, or dedicate a spare fridge/cabinet for bagless aging. A main kitchen fridge that’s opened frequently is not recommended for bagless aging because temperature and humidity fluctuate and cross‑contamination risk rises.
How do I know if the mold is safe?
White or gray surface molds that are dry and velvety are common and can be trimmed away; colored molds (green, black, pink) or any sliminess or putrid smell indicate spoilage and the roast should be discarded. When in doubt, err on the side of safety.
How big a roast should I start with as a beginner?
A 10–14 lb bone‑in rib roast or large strip loin gives predictable results for first attempts. Smaller individual steaks dry out faster and are not recommended for unbagged aging at home.
Do dry‑aging bags change the flavor?
Permeable bags produce a flavor profile close to traditional dry‑aging while reducing trimming losses and contamination. There is some difference in oxidation and surface character, but many home cooks report flavors indistinguishable from bagless aging at common home aging windows (14–45 days).
Dry‑aging at home in 2026 is easier to manage than ever if you invest in decent monitoring and commit to disciplined sanitation. Start with one roast, track data, and adjust airflow, RH and timing to match your flavor preference. The result: steaks with depth and texture that reward patience and attention.